
Negative Inventory in QuickBooks: How to Find and Fix It

Negative inventory in QuickBooks means the quantity on hand for an item has dropped below zero, almost always because a sale was recorded before the matching purchase or receipt hit the books. The fix starts before you touch a single adjustment: run the Inventory Valuation Detail report (or Inventory Valuation Summary “as of” a specific date), and stop finalizing new sales for affected items until you’ve diagnosed the scope. Skipping that step is how a small timing glitch turns into a COGS mess spanning several months.
- Run Inventory Valuation Detail or Summary first, before making any changes
- Switch new sales to estimates or pending status until the item is cleared
- Don’t touch quantity adjustments until you know which SKUs are affected and by how much
Left alone, negative inventory doesn’t just look wrong on a report. It actively distorts your cost of goods sold and inflates or understates your inventory asset value on the balance sheet, sometimes for months before anyone notices.
Key Takeaways
Negative inventory in QuickBooks stems from sales recorded before purchases, and fixing it requires diagnosing scope, entering itemized bills, and auditing the financial fallout before adjusting quantities.
| Point | Details |
|---|---|
| Diagnose before you touch anything | Run Inventory Valuation Detail or Summary “as of” a set date and filter for quantity on hand below zero. |
| Triage by materiality | Group negative items by dollar exposure and sales activity to decide which need full reconstruction versus a quick adjustment. |
| Fix in the right order | Back up the file, convert POs to bills, count physically, then enter itemized bills before using batch adjustments. |
| Watch the financial fallout | Check for skewed COGS, vendor-tied Inventory/COGS adjustments, and misstated gross margin after each fix. |
| Prevent recurrence | Enable inventory warnings, use non-posting sales documents, and train staff on the Item tab versus Expense tab distinction. |
Table of Contents
- What Causes Negative Inventory and How Do You Find It?
- How Do You Fix Negative Inventory in QuickBooks?
- How Does Negative Inventory Distort Your Financials?
- How Do You Prevent Negative Inventory From Coming Back?
- Where Automation Fits Into Negative Inventory Prevention
- How Do You Recover From a Negative Inventory Error Without Losing Data?
- How Do You Handle Negative Inventory on Assemblies or Serialized Items?
- What This Really Comes Down To
- Sources
- FAQ
What Causes Negative Inventory and How Do You Find It?
Negative inventory almost always traces back to sequence, not math. A sale gets recorded, invoiced, or shipped before the corresponding bill, item receipt, or purchase order conversion makes it into QuickBooks. Sometimes it’s a vendor bill entered on the Expense tab instead of the Item tab, which never touches inventory quantity at all. Sometimes it’s a missing item starting date that quietly blocks earlier corrections.
Finding the damage takes three reports, used in this order:
- Inventory Valuation Detail, set “as of” your diagnostic date, to see the full transaction trail for each item
- Inventory Valuation Summary, for a faster item-by-item snapshot of quantity on hand
- Negative Item Listing, available in QuickBooks Enterprise, which filters directly to items sitting below zero
Export the results to a spreadsheet and filter for quantity on hand less than zero. From there, sort by dollar exposure and sales velocity. A discontinued item sitting at negative 2 units doesn’t deserve the same attention as an active bestseller showing negative 400 units and climbing. Group items into “material, needs full reconstruction” versus “immaterial, quick fix” buckets before you touch anything, per QuickBooks’ own troubleshooting guidance.
Pro Tip: Before running any adjustment, check the item’s starting date in its edit screen. QuickBooks blocks adjustments dated earlier than that starting date, which is one of the most common reasons a “fix” silently fails to save.
How Do You Fix Negative Inventory in QuickBooks?
Fixing negative inventory is a sequence, not a single click. Rushing to “Adjust Quantity/Value on Hand” without doing the groundwork first is exactly how audit trails get messy and COGS ends up wrong in a different period than before.
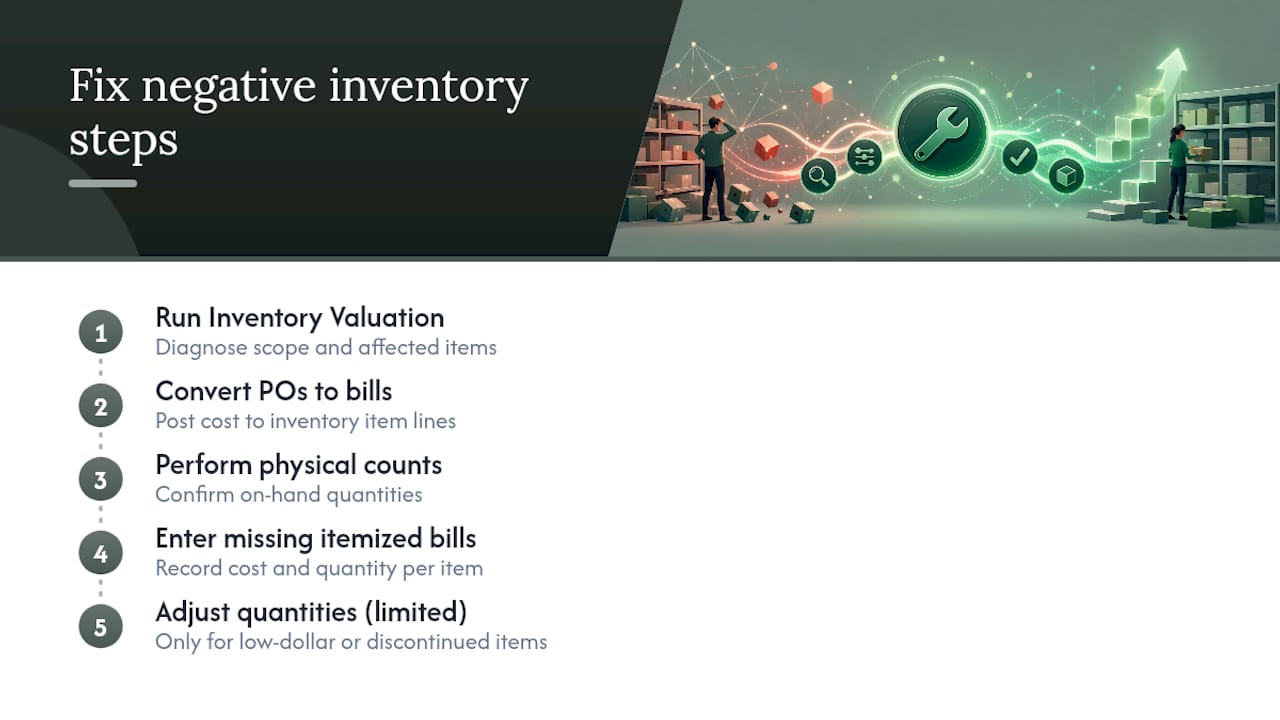
- Back up the company file. Do this before touching a single transaction, and never overwrite an existing backup. Document the materiality threshold you’re using (dollar amount or SKU list) so the scope of the cleanup is defensible later.
- Convert open purchase orders to bills. If inventory was received but never entered, converting the PO to a bill attributes the cost increase to the correct item line, rather than burying it as a generic expense.
- Do a physical count. For businesses with more than a handful of negative SKUs, count first, then reconcile the count against what QuickBooks thinks you have.
- Enter missing itemized bills or receipts. Where a purchase genuinely happened but never got recorded, enter it as an itemized bill dated to match the real transaction, not backdated arbitrarily. If the original paperwork supports an earlier date, use it, but keep the documentation attached.
- Use batch adjustments only for the immaterial stuff. QuickBooks Online Plus and Advanced support batch inventory quantity adjustments, which work well for a pile of small, low-dollar, discontinued items. Save the manual, transaction-level reconstruction for anything material.
- Reconcile Inventory Asset against COGS, then rerun the report. Once fixes are entered, pull Inventory Valuation Detail again and confirm every previously negative item now shows zero or positive quantity on hand.
A few things trip people up during this process:
- Entering a purchase on the Expense tab instead of the Item tab, which never updates inventory quantity
- Choosing an adjustment date earlier than the item’s starting date, which QuickBooks quietly rejects
- Using a generic “inventory adjustment” when an itemized bill would preserve a cleaner audit trail
That last point matters more than it looks. An itemized bill ties the cost back to a vendor and a specific line item, so anyone reviewing the books later can see exactly what happened and why. A vague adjustment with no memo just creates a new question mark. If the correction is material enough to shift prior-period numbers, loop in whoever handles your tax filings or annual review before you finalize anything, since backdated fixes can ripple into figures they’ve already signed off on.
How Does Negative Inventory Distort Your Financials?
When you sell an item that shows zero or negative quantity on hand, QuickBooks doesn’t leave the cost blank. It assigns an assumed cost, sometimes pulling from the item’s last known cost, sometimes defaulting to $0.00, according to QuickBooks Desktop’s own documentation on the issue. That guess flows straight into your cost of goods sold for that period.
- Gross margin looks artificially high or low, depending on which way the assumed cost skewed
- When the real bill finally posts, QuickBooks creates an Inventory/COGS adjustment tied to that vendor, which can make vendor-level cost reports look erratic even though the vendor did nothing wrong
- COGS ends up recognized in the wrong accounting period entirely
- The balance sheet’s inventory asset value stops reflecting what you actually hold
This is why Kaufman Rossin’s analysis frames negative inventory as a timing problem rather than a cosmetic glitch. It’s the kind of issue that looks small on a single item and turns into a real headache once it’s spread across a full fiscal year and someone is trying to close the books.
How Do You Prevent Negative Inventory From Coming Back?
Cleanup only sticks if you change the workflow that caused the problem in the first place. A few settings and habits handle most of it.
- Turn on QuickBooks’ “warn if not enough inventory to sell” preference so staff see a flag before finalizing a sale on a short item
- Set reorder points for fast-moving SKUs so purchasing happens ahead of the shortfall, not after
- Use estimates, sales orders, or pending invoices for stock that isn’t confirmed yet, since these are non-posting documents that don’t touch inventory counts
- Always enter incoming stock as itemized bills or item receipts before finalizing the matching sale, never the reverse
- Add accurate opening balances the moment a new SKU is created, rather than leaving it at zero
- Schedule a recurring physical count and a monthly Inventory Valuation Summary review as a standing item on someone’s calendar
- Map your inventory adjustment account correctly (shrinkage versus COGS) so corrections don’t quietly distort the wrong line
Training matters as much as settings. The single most common data-entry mistake behind negative inventory is a bill entered on the Expense tab instead of the Item tab. It’s an easy keystroke error, and it never touches quantity on hand, so it can go unnoticed for weeks. Kaufman Rossin’s guidance treats this distinction as one of the highest-value things to train new staff on.
Pro Tip: Print or screen-share the Item tab versus Expense tab difference during onboarding. It takes five minutes to explain and prevents a category of errors that otherwise surfaces months later during reconciliation.
Where Automation Fits Into Negative Inventory Prevention
Manual reconciliation catches negative inventory after it happens. For Amazon and multi-channel sellers, Beanhawk is built to catch the underlying timing problem earlier, before it ever shows up as a negative quantity in your books.
- Beanhawk automates settlement posting into QuickBooks and Xero, which closes the timing gap between when a sale happens and when the matching cost data lands in your accounting system
- Continuous monitoring of inbound shipments and FBA ledger events flags missing receipts and ledger discrepancies before they turn into negative quantity on hand
- Beanhawk’s resources on reconciling QuickBooks Online and unreconciling transactions walk through the verification steps that follow a cleanup
For sellers juggling FBA reimbursements on top of inventory reconciliation, the two problems tend to compound each other. A lost or damaged shipment that never gets reconciled properly can leave phantom quantity sitting in QuickBooks long after Amazon’s own ledger has moved on.
Sellers running multiple channels rarely have a negative inventory problem in isolation. It’s usually one symptom of a bigger posting and timing gap between the marketplace and the books.
If you want to see where those gaps exist in your own account, Beanhawk offers a free audit that checks your inbound shipment and ledger data against what’s posted in QuickBooks.
Pro Tip: Run a free audit before your next month-end close. Catching a posting mismatch before you file is far cheaper than unwinding it after your accountant has already used the numbers.
How Do You Recover From a Negative Inventory Error Without Losing Data?
The riskiest part of any inventory cleanup isn’t the math. It’s the moment someone makes a change that can’t be undone cleanly. That’s why backing up the company file before you start isn’t optional busywork. It’s your rollback plan if a batch adjustment goes sideways or a reconstructed bill turns out to be wrong.
In QuickBooks Desktop, create a full company file backup and store it somewhere separate from your working file, labeled with the date and the reason (“pre negative-inventory cleanup, Q1 2026”). In QuickBooks Online, Intuit retains automatic backups, but exporting your own copy of the Inventory Valuation Detail report before changes gives you a snapshot you control, independent of Intuit’s retention window.
Document every change as you make it. A simple workpaper listing the item, the transaction added or adjusted, the dollar amount, and the reason turns a messy cleanup into something an accountant or auditor can follow later. This matters most when corrections touch a prior period, since anyone reviewing year-end numbers will want to see why an adjustment landed where it did.
If a fix genuinely goes wrong, restoring from backup is far less painful than trying to reverse a tangle of manual adjustments after the fact. Treat the backup step the same way you’d treat a database migration at any company: assume something could break, and make sure reversing it takes minutes, not days.
How Do You Handle Negative Inventory on Assemblies or Serialized Items?
Standard inventory items are hard enough. Assemblies and serialized inventory raise the difficulty another notch, because a single missing component can cascade into negative quantity across an entire finished-goods line.
With assembly items, a negative quantity often doesn’t mean the assembly itself is missing. It usually means one of its component parts went negative first, and QuickBooks let the assembly build proceed anyway. Before adjusting the assembly’s quantity, check each component’s Inventory Valuation Detail individually. Fixing the component almost always resolves the assembly’s negative balance without touching the assembly record directly.
Serialized or lot-tracked inventory adds another layer, since QuickBooks needs the specific serial or lot number tied to each transaction, not just a quantity. A negative balance on a serialized item usually points to a sale recorded against a serial number that was never formally received into inventory. Reconstructing these requires pulling the original packing slip or receiving document to confirm which serial numbers actually arrived and when, then entering the item receipt against that specific serial before touching the sale.

For businesses running heavy assembly or serialized workflows, this is usually where a straight batch adjustment stops being appropriate. The safer move is transaction-level reconstruction, even though it takes longer, because guessing at serial numbers or assembly components creates errors that are much harder to trace six months later.
What This Really Comes Down To
Most advice on negative inventory treats it like a checklist problem: run this report, click this button, done. That undersells what’s actually happening. Negative inventory is a symptom of a sequencing failure between your operations and your books, and the fix that actually holds is the one that changes the sequence, not just the number on the screen.
Where I’d push back on common advice: too many guides jump straight to “Adjust Quantity/Value on Hand” as the default fix. It’s often the wrong tool. An itemized bill preserves the vendor relationship and the cost trail; a generic adjustment erases both. Save adjustments for genuinely immaterial, discontinued SKUs, and reconstruct everything else properly.
If you’re running an Amazon or multi-channel operation, manual reconciliation will always be playing catch-up with settlement timing you don’t control. That’s the specific gap tools like Beanhawk are built to close, but even without automation, the discipline of entering purchases before sales will solve most of this on its own.
Sources
- Fix negative inventory issues - QuickBooks - Intuit
- QuickBooks Tip: How to Avoid Negative Inventory - Kaufman Rossin
FAQ
How Can I Fix Negative Inventory Issues in QuickBooks Desktop?
Run Inventory Valuation Detail to find affected items, convert any open purchase orders to bills, perform a physical count, and enter missing itemized bills before adjusting quantities. Check each item’s starting date first, since QuickBooks blocks adjustments dated earlier than that.
What Does Negative Inventory Indicate?
It indicates a sale was recorded in QuickBooks before the matching purchase, bill, or receipt was entered, so the system let quantity on hand drop below zero. It’s a timing and sequencing issue, not a sign that inventory physically went negative.
How Do I Fix a Negative Balance in QuickBooks?
Diagnose the scope first with Inventory Valuation Detail, then enter the missing itemized bill or receipt so the cost and quantity post to the correct item line. Reserve quantity adjustments for low-dollar, discontinued items rather than using them as the default fix.
What Happens if a Change in Inventory Is Negative?
A negative change in quantity on hand forces QuickBooks to assign an assumed cost to the sale, sometimes $0.00, which distorts cost of goods sold until the real purchase bill is entered. It can also create vendor-tied Inventory/COGS adjustment entries that make vendor cost reports look inconsistent.